Spring has officially arrived and the chore of spring cleaning is tapping on our shoulders! We know cleaning isn’t always the most exciting thing, but this seasonal chore keeps your home and health in good condition. And we are here to help make it less overwhelming and more manageable!
With a few supplies and a plan of action, spring cleaning will renew your spirit, help you feel more organized, and increase your clarity. It’s time to roll up those sleeves and get started!
Cabinets
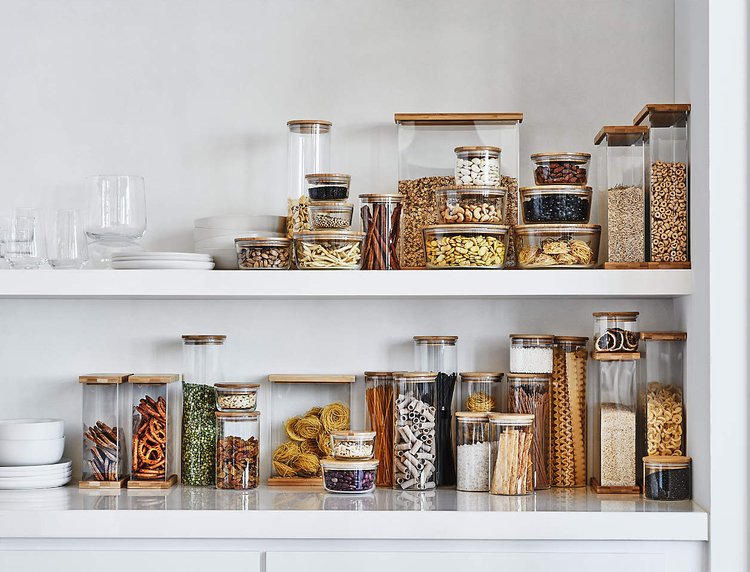
Start by removing everything from your cabinets. This will give you a better idea of what you have and need to keep. If removing everything all at once seems like a daunting task, start working on one set of cabinets at a time.
- Clean the inside of the cabinets thoroughly, wiping down the shelves and walls with a damp cloth or sponge.
- Once everything is out of the cabinets, sort through the items and group them into categories such as kitchenware, baking supplies, canned goods, etc.
- Check the expiration dates and discard anything that has expired. Even those unopened seasoning packets that are expired need to go!
- Get rid of anything that you no longer need or can’t use. That tupperware lid that’s missing a container… toss it.
- Organize your items based on usage, so they are within easy reach.
- Consider using storage solutions such as shelf risers, baskets, and containers to maximize your cabinet.
Windows
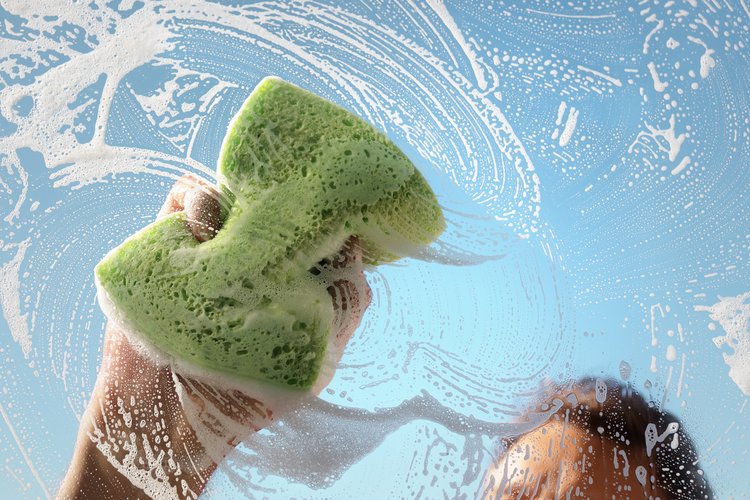
After the winter months, your windows are ready to let the sunshine in! You’ll need a squeegee, a bucket, a cleaning solution, possibly a stepstool, and a clean microfiber cloth or paper towels.
- Use a soft-bristled brush or a vacuum with a soft brush attachment to remove any dirt, dust, or cobwebs from the window frames, sills, and tracks.
- Dip a clean sponge or cloth into the cleaning solution, and apply it to the glass in a circular motion. Make sure to get the edges and corners of the window as well.
- Starting at the window’s top corner, drag the squeegee down in a straight line, wiping the blade with a clean cloth or paper towel after each pass. Make sure to squeegee the entire window!
- Use a clean microfiber cloth or paper towel to wipe away any excess water from the edges and corners of the window.
- Repeat the process on the other side.
- Inspect the window for streaks or spots, and use a clean cloth or paper towel to buff them out.
- While you have all your window cleaning supplies out, this is the perfect opportunity to clean the glass on your shower as well!
Countertops

It’s time to get rid of any dirt, grime, or bacteria that may have accumulated from all of the holiday cooking and baking.
- Take the opportunity to declutter any unnecessary items and organize what’s left. This will not only make it easier to maintain, but it will also provide the feeling of a tidy kitchen.
- Use a damp cloth or sponge and a mild cleaning solution (such as a mixture of water and Dawn dish soap) to wipe down your countertops. Make sure to get into all the nooks and crannies. An old toothbrush will do the trick.
- Once your countertops are clean, use a disinfectant spray or wipes to kill germs or bacteria!
- If you have appliances on your countertops, take the time to clean them as well. Wipe down the exteriors and interiors with a damp cloth, and use a cleaning solution as needed.
- For a final touch, use a countertop polish or cleaner to give your surfaces a shiny, sparkling look. And then tell the kids the kitchen is closed for the next 24 hours for visual enjoyment!
Remember, different types of countertops require different cleaning methods. For example, granite countertops should not be cleaned with acidic or abrasive cleaners. Be sure to check the manufacturer’s instructions or consult a professional if you’re unsure how to clean your specific type of countertop.
Bedding

Even though it is recommended to wash your bedding at least once every two weeks, we are adding this as part of your spring cleaning! After you clean your house, it will feel good to crawl into a clean bed.
- Strip your bed of all sheets, pillowcases, and covers and wash them in hot water– this will help kill any bacteria, dust mites, and other allergens that may have accumulated on them.
- Vacuum your headboard, footboard, and mattress to remove any dust, dirt, and debris.
- If you use a duvet or comforter, wash it according to the care instructions.
Carpet

Your carpet takes a beating during the winter months, especially around the holidays. From wet conditions outside to extra feet walking through the house, your carpet most likely needs shampoo love.
If you have any stains on your carpet, use a carpet stain remover to spot-clean them. Be sure to test the product on an inconspicuous area first to make sure it doesn’t damage the carpet.
- To deep clean your carpet, rent a carpet cleaner or hire a professional cleaning service. Follow the instructions carefully, and move furniture out of the way.
- After deep cleaning your carpet, allow plenty of time to dry completely before walking on it or moving furniture. Pro-tip, you can test the dryness of your carpet by walking on it with a clean pair of socks!
- To help keep your carpet stay clean in the future, use doormats at every entrance to your home, or you can introduce the “remove your shoes” rule. This can help to reduce the amount of outside elements that get tracked in!
Oven
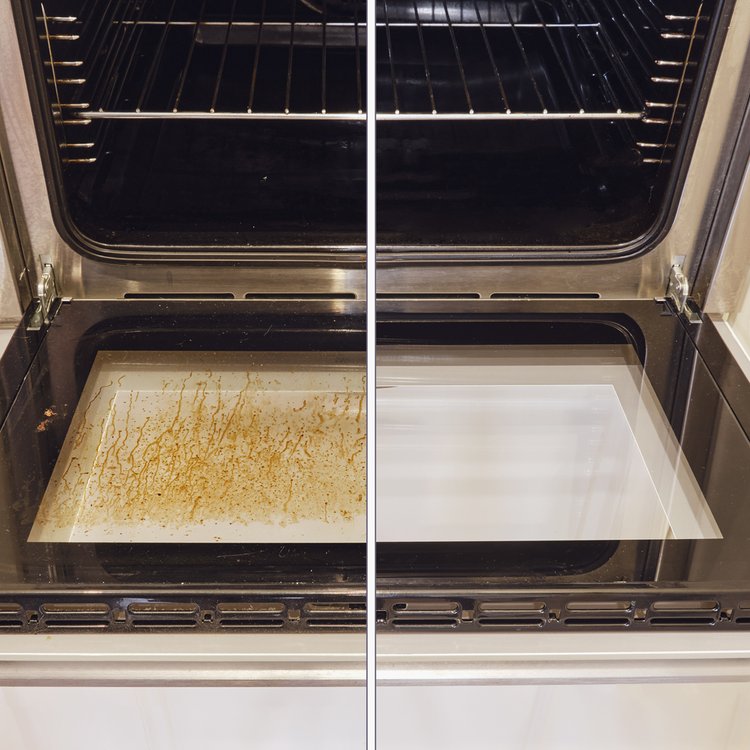
Cleaning your oven is an important task to ensure that it functions efficiently and remains in good condition. Burnt grease and food can build up over time, and the carbon particles can make their way into the flavor of your food. If you are wondering why your casserole tastes a little different, a dirty oven may be the culprit!
- Remove the oven racks, baking sheets, and any other removable parts from the oven.
- Mix a cleaning solution by combining baking soda, water, and dish soap in a bowl. Use enough water to create a paste-like consistency. Or you can use a more potent cleaner such as Easy Off to help remove the stubborn grease spots.
- Apply the cleaning solution to the interior surfaces of the oven, including the sides, back, and bottom. Avoid getting the solution on the heating elements.
- Allow the solution to sit on the surfaces for at least 15 minutes.
- Use a damp sponge or cloth to wipe away the cleaning solution, along with any grease, food residue, or stains.
- Use a scraper or a scrub brush to remove tough stains.
- Rinse the cloth or sponge, and repeat until cleaning solution is removed.
- Dry the interior of the oven with a clean cloth.
- Clean the oven racks and other removable parts, and dry them before putting them back in the oven.
- For your oven door glass, barkeeper’s friend is an excellent option! Make sure to follow the instructions.
Baseboards
Cleaning baseboards can be a bit of a chore, but with a few simple steps, you can get them to look sparkling clean in no time.
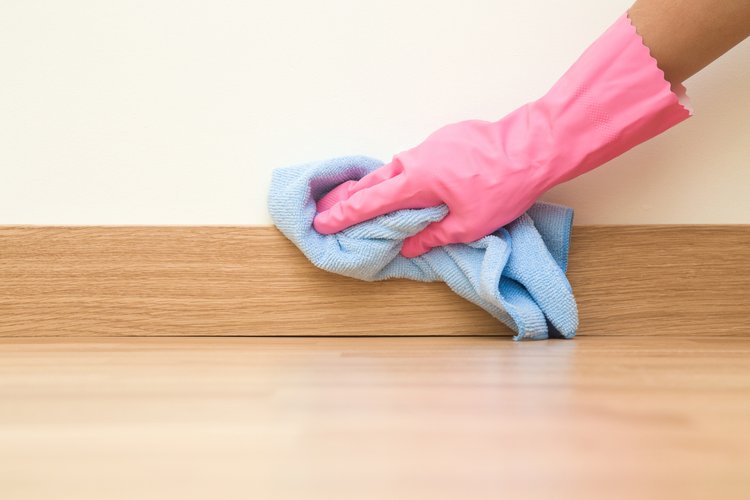
- Start by removing any loose dust from the baseboards using a soft-bristled brush or a dry microfiber cloth. Work your way around the room, paying particular attention to any corners or crevices where dust tends to accumulate.
- Mix a solution of warm water and mild dish soap in a bucket. Using the solution, wipe the baseboards.
- If you come across any stubborn stains or dirt, you can use a bit of baking soda mixed with water to make a paste, or you can try using the magic eraser!
- Once you’ve cleaned all the baseboards, using a dry microfiber cloth, remove any remaining moisture.
- This is the perfect time to touch up any dings.
Blinds & Shutters
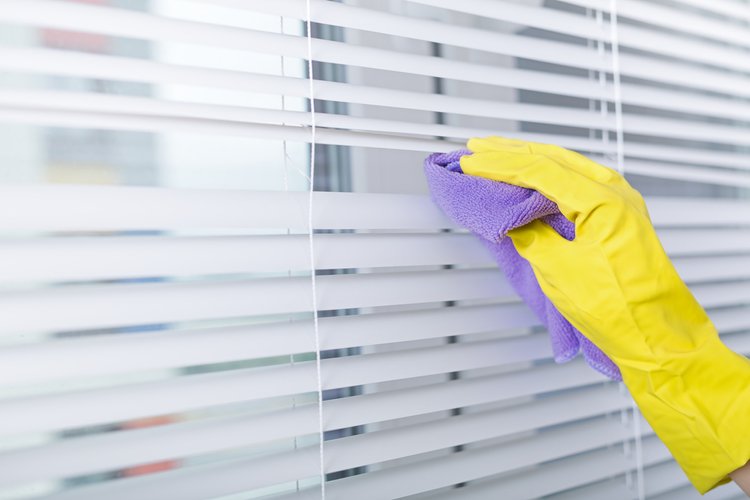
Have you ever looked at your blinds when the sun shines in and cringed at the layer of dust? Blinds and shutters act as a filter in your home, and removing the dust and allergen build-up will improve the air quality.
- Dust the blinds with a soft cloth or a duster. You can also use a vacuum cleaner with a soft brush attachment.
- You can spot clean any stubborn stains or marks using a mild cleaner and a soft cloth.
- Once the blinds are clean, it’s important to maintain them regularly to keep them looking their best and to minimize allergens.
Bathrooms
Cleaning the bathroom is our favorite chore… said no one ever! But it is a necessary chore, nonetheless, and someone has to do it.
- Take everything out of the bathroom, including towels, bath mats, and shower curtains.
- Using a vacuum, remove any loose dirt, hair, and cobwebs from the floors, walls, and ceiling.
- Apply cleaning solutions to the bathtub, shower, sink, toilet, and any other surfaces that need to be cleaned. We recommend letting the solution sit for a few minutes to loosen any stains.
- Using a scrub brush or sponge, clean the surfaces treated with cleaning solutions. Rinse with water to remove any residue.
- Using a toilet cleaner, clean the toilet bowl inside, outside, and around the base of the toilet. If you struggle to remove hard water stains, a pumice stone will do the trick.
- Use a cloth or sponge to wipe down all surfaces, including mirrors, countertops, and fixtures.
- Use a mop or a sponge to clean the floors. Make sure to clean under the toilet and in the corners of the room.
While the list may be long, it doesn’t need to be done in one or even a few days. Spring cleaning can be tackled one chore at a time; in fact, we recommend taking your time so that you are more likely to stick with it!
Little by little, you and your home will feel revived and ready for the new season!
Happy Spring Cleaning!